ThunderBird-easy-send-mail-1-ver.1.1(ENG).xlsm
0.03MB
ThunderBird-easy-send-mail-2-ver.2.1(ENG).xlsm
0.13MB
July 25, 2024
ThunderBird-easy-send-mail-1-ver.1.1
ThunderBird-easy-send-mail-1-ver.2.1
Here’s the update!
What’s New (2024.07.25)
- File attachment feature has been improved.
- Now you can select files directly instead of typing in the file path. (But you can still type it if you want.)
- You can attach unlimited files! Just select the files you want, and their paths will automatically be listed, separated by commas. Of course, you can still write them manually if you prefer.
- There’s a new reset button for attachments. Make sure to hit that before adding new files!
Quick Guide (VER 1.1)
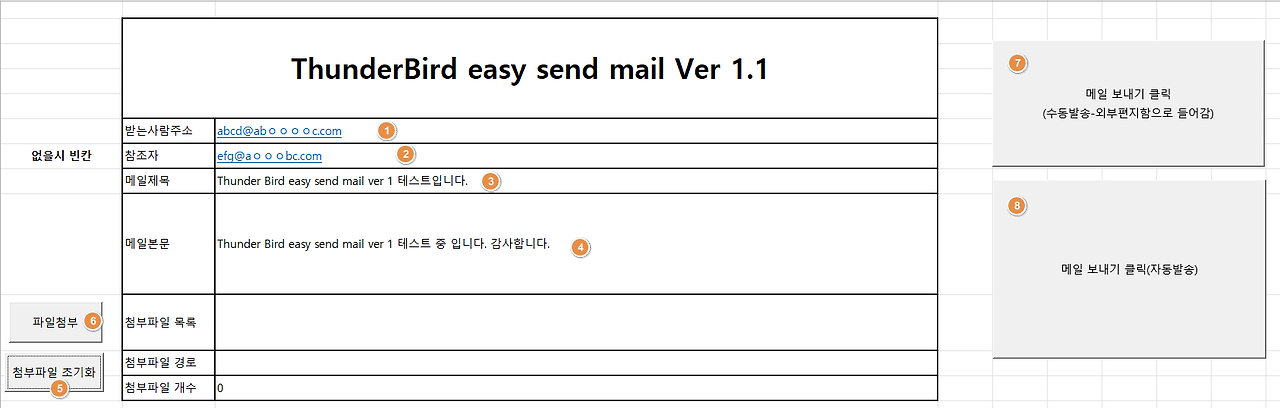
- Version 1.1 is great for sending individual emails. You can copy from the specs tab next to it for better usability.
- Recipient Address: For sending to more than one person, just separate the email addresses with commas.
- CC Address: If you don’t need it, leave it blank. You can also separate multiple addresses with commas.
- Subject: Pretty straightforward.
- Body: You can even use HTML tags here (like <BR>), and they’ll show up fine in the email.
- Reset Attachments: This clears any existing files. Hit this before you start a new email with attachments.
- File Attachment Button: Click this to choose files to attach. When you select a file, its name and path will automatically show up in the attachment list. You can attach as many files as you need!
- Manual Send Button: Clicking this will take you to Thunderbird’s external mailbox, so you’ll need to run Thunderbird to send those emails.
- Auto Send Button: Choose this, and the email will be sent right away!
Quick Guide (VER 2.1)
- Version 2.1 is super handy for sending things like pay stubs or monthly bills to different recipients. Since the filenames change monthly, you can set it up once and use Excel’s find-and-replace feature to update the file names for each month. Super convenient for automating your work!
- Also, version 2.1 has formulas just like 1.1, so don’t mess with them unless you know what you’re doing.
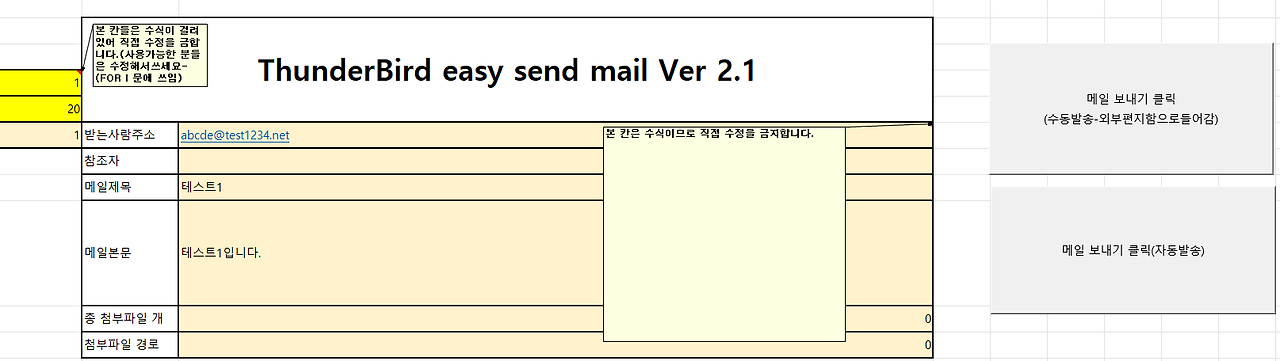
Mail Tab in Ver 2.1
This tab is mostly for pulling info from the 'Mail List' tab to send emails. You won’t have to do much else here besides using the manual and auto send buttons on the right.

Mail List Tab Screen
- Sequence Number: This shows how many emails you’re sending. If you’re sending to 20 people, you need numbers 1 to 20 in order. If you skip any, just delete those numbers and continue from the next one.
- Recipient Address: Again, separate with commas if you have more than one.
- CC Address: Same deal, commas for multiple addresses.
- Subject: Easy peasy.
- Body: You got this.
- Attachment List: When you attach files, their names will show up here automatically.
- Attachment Paths: When you attach files, their paths will automatically populate here too. If you have more than one, they’ll be separated by commas. If you’re entering them manually, just use commas between paths.
- File Attachment Button: Choose the files you want to attach.
- Reset Button: Make sure to press this before you start a new email with attachments.
- How Attachments Work: As long as the paths are correct and separated by commas, the files will attach properly, even if the names differ from the list. But seriously, reset your old paths when you start a new email!
- Miscellaneous: For those sending monthly statements, just set it up once and then use Ctrl+F to swap out the month in the file paths for the next month. If the file paths are right, attachments will work like a charm!
If you have any questions or suggestions while using it, feel free to drop a comment. I’ll do my best to incorporate your feedback!
Hope this helps! Let me know if you need anything else.